The first step - create a project and implement a simple shopping cart
Let's implement a simple "e-commerce cart" requirement to see how to develop using Newbe.Claptrap.
Business needs
Realize a simple "e-commerce shopping cart" requirement, where a few simple business:
- Get items and quantities in your current shopping cart
- Add items to your shopping cart
- Remove specific items from your shopping cart
Install project templates
First, you need to make sure that you have installed the . NetCore SDK 3.1.You can click here for the latest version for installation。
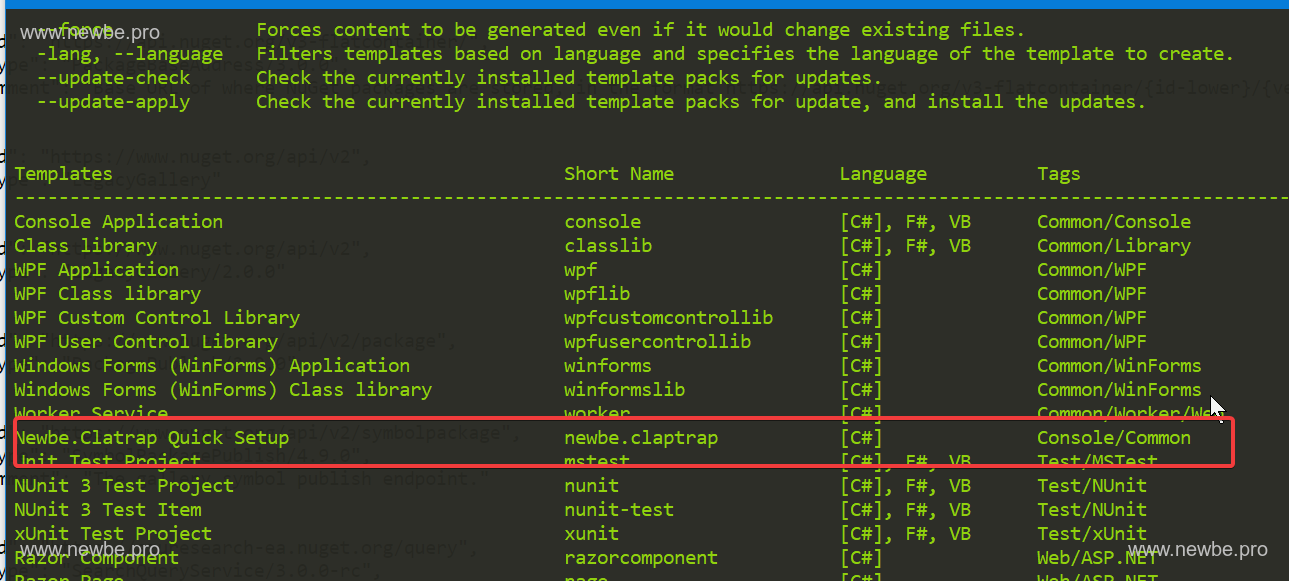
Once the SDK is installed, open the console and run the following commands to install the latest project templates:
dotnet new --install Newbe.Claptrap.Template
Once installed, you can see the project templates that have already been installed in the installation results.
Create a project
Select a location to create a folder, and this example selects theD:\Repo and Create a directory named HelloClaptrap.The folder will be used as a code folder for new projects.
Open the console and switch the work directory toD:\Repo\HelloClaptrap。Then run the following command to create a project:
dotnet new newbe.claptrap --name HelloClaptrap
In general, we recommend that the
D:\Repo\HelloClaptrapshould be created as a Git repository.Manage your source code with version control.
Compilation and startup
Once the project is created, you can compile the solution with your favorite IDE.
Once compiled, start both web and BackendServer projects with the Startup feature on the IDE.(VS needs to start the service as console, and if you use IIS Express, you need the developer to look at the port number to access the web page)
If it is started, you can visiti http://localhost:36525/swagger to view the API description of the sample.This includes three mainly APIs:
GET/api/Cart/{id}Get items and quantities in a specific id shopping cartPOST/api/Cart/{id}Add a new item to the purchase of the specified idDELETE/api/Cart/{id}Remove a specific item from the shopping cart of the specified id
You can try to make several calls to the API through click the Try It Out button on the UI.
It is no effect when add product at first time?
Yes, you're right.There are BUGS in the business implementation in the project template.
Next, let's open the project and troubleshoot and resolve these bugs by adding some breakpoints.
And by locating the BUG, you could understand the framework's code flow process.
Add breakpoints
The following instructions about adding the location of breakpoints base on different IDE, and you can choose the IDE you are used to operating.
If you don't currently have an IDE on hand, you can also skip this section and read directly what follows.
Visual Studio
Start both projects at the same time, as mentioned above.
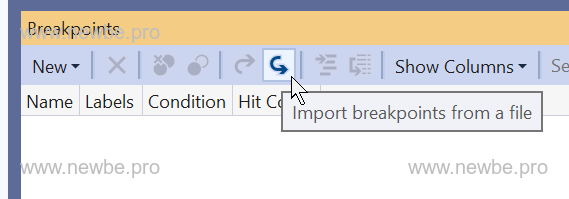
Import breakpoints:Open the Breakpoint window, click the button, select breakpoints.xml file under project.You can find the location in the two screenshots below.

Rider
Start both projects at the same time, as mentioned above.
Rider does not currently have a breakpoint importing feature.Therefore, you need to manually create breakpoints at the following locations:
| File | Line No. |
|---|---|
| CartController | 30 |
| CartController | 34 |
| CartGrain | 24 |
| CartGrain | 32 |
| AddItemToCart Event Handler | 14 |
| AddItemToCart Event Handler | 28 |
"Go To File" lets you quickly locate where your files are located
Start debugging
Next, we take a request to see how the entire code runs.
First, let's send a POST request through the swagger interface and try adding items to the shopping cart.
CartController Start
The first lifeline is the Controller code for the Web API layer:
[HttpPost("{id}")]
public async Task<IActionResult> AddItemAsync(int id, [FromBody] AddItemInput input)
{
    var cartGrain = _grainFactory.GetGrain<ICartGrain>(id.ToString());
    var items = await cartGrain.AddItemAsync(input.SkuId, input.Count);
    return Json(items);
}
In this code, we pass_grainFactoryto create aICartGrainInstance.
This instance is essentially a proxy that points to a specific grain in Backend Server.
The incoming id can be considered a unique identifier for the location instance.In this business context, it can be understood as "cart id" or "user id" (if each user has only one shopping cart).
Continue with debugging and move on to the next step, let's see how the inside of ICartGrain works.
CartGrain Start
The next stop point is the CartGrain code.:
public async Task<Dictionary<string, int>> AddItemAsync(string skuId, int count)
{
    var evt = this.CreateEvent(new AddItemToCartEvent
    {
        Count = count,
        SkuId = skuId,
    });
    await Claptrap.HandleEventAsync(evt);
    return StateData.Items;
}
Here is the core of the framework implementation, as shown in the following image.:
Specifically, the code has run to a specific shopping cart object.
You can see through the debugger that both the incoming skuId and count are parameters passed from Controller.
Here you can do these things.:
- Modify the data in Claptrap with events
- Read data saved in Claptrap
In this code, we create a AddItemToCartEvent object to represent a change to the shopping cart.
It is then passed to Claptrap for processing.
Claptrap updates its State data after accepting the event.
Finally, we return StateData.Items to the caller.(Actually, StateData.Items is a quick property for Claptrap.State.Data.Items.)So it's actually still read from Claptrap. )
From the debugger, you can see that the data types of StateData are shown below.:
public class CartState : IStateData
{
    public Dictionary<string, int> Items { get; set; }
}
This is the status of the shopping cart designed in the sample.We use a Dictionaryto represent the SkuId in the current shopping cart and its corresponding quantity.
Continue debugging and move on to the next step to see how Claptrap handles incoming events.
AddItemToCart Event Handler Start
Again, the point of interruption is this code below.:
public class AddItemToCartEventHandler
    : NormalEventHandler<CartState, AddItemToCartEvent>
{
    public override ValueTask HandleEvent(CartState stateData, AddItemToCartEvent eventData,
        IEventContext eventContext)
    {
        var items = stateData.Items ?? new Dictionary<string, int>();
        if (items.TryGetValue(eventData.SkuId, out var itemCount))
        {
            itemCount += eventData.Count;
        }
        // else
        // {
        //     itemCount = eventData.Count;
        // }

        items[eventData.SkuId] = itemCount;
        stateData.Items = items;
        return new ValueTask();
    }
}
这段代码中,包含有两个重要参数,分别是表示当前购物车状态的 CartState 和需要处理的事件 AddItemToCartEvent。
We determine whether the dictionary in the state contains SkuId seamount according to business needs and update its number.
Continue debugging and the code will run until the end of this code.
At this point, through the debugger, you can see that the stateData.Items dictionary has increased by one, but the number is 0.The reason is actually because of the else snippet above, which is the cause of the BUG that always fails to add a shopping cart for the first time.
Here, do not interrupt debugging immediately.Let's go ahead and let the code go through to see how the whole process ends.
In fact, continuing debugging, the breakpoint hits the end of the cartGrain and CartController methods in turn.
This is actually a three-tier architecture!
The vast majority of developers understand the three-tier architecture.In fact, we can also say that Newbe. Claptrap is actually a three-tier architecture.Let's compare it in a table.:
| Traditional three-tiered | Newbe.Claptrap | Description |
|---|---|---|
| Presentation Layer | Controller Layer | Used to dock external systems to provide external interoperability |
| Business Tier | Grain Layer | Business processing based on incoming business parameters (sample does not actually write judgment, need to judge count > 0) |
| Persistence Layer | EventHandler Layer | Update business results |
Of course, the above analogy is a simple description.In the specific process, there is no need to be too entangled, this is only an auxiliary understanding of the statement.
You also have a BUG to fix
Then we go back and fix the previous "First Join Products Don't Take Effect" issue.
This is a framework for considering unit testing
There is a project in the project template.HelloClaptrap.Actors.Tests.The project contains unit tests of the main business code.
We now know thatAddItemToCartEventHandler.The code in the comments is the main cause of the BUG.
We can use it.dotnet test.If you run the unit tests in your test project, you get two errors:
A total of 1 test files matched the specified pattern.
  X AddFirstOne [130ms]
  Error Message:
   Expected value to be 10, but found 0.
  Stack Trace:
     at FluentAssertions.Execution.LateBoundTestFramework.Throw(String message)
   at FluentAssertions.Execution.TestFrameworkProvider.Throw(String message)
   at FluentAssertions.Execution.DefaultAssertionStrategy.HandleFailure(String message)
   at FluentAssertions.Execution.AssertionScope.FailWith(Func`1 failReasonFunc)
   at FluentAssertions.Execution.AssertionScope.FailWith(Func`1 failReasonFunc)
   at FluentAssertions.Execution.AssertionScope.FailWith(String message, Object[] args)
   at FluentAssertions.Numeric.NumericAssertions`1.Be(T expected, String because, Object[] becauseArgs)
   at HelloClaptrap.Actors.Tests.Cart.Events.AddItemToCartEventHandlerTest.AddFirstOne() in D:\Repo\HelloClaptrap\HelloClaptrap\HelloClaptrap.Actors.Tests\Cart\Events\AddItemToCartEventHandlerTest.cs:line 32
   at HelloClaptrap.Actors.Tests.Cart.Events.AddItemToCartEventHandlerTest.AddFirstOne() in D:\Repo\HelloClaptrap\HelloClaptrap\HelloClaptrap.Actors.Tests\Cart\Events\AddItemToCartEventHandlerTest.cs:line 32
   at NUnit.Framework.Internal.TaskAwaitAdapter.GenericAdapter`1.GetResult()
   at NUnit.Framework.Internal.AsyncToSyncAdapter.Await(Func`1 invoke)
   at NUnit.Framework.Internal.Commands.TestMethodCommand.RunTestMethod(TestExecutionContext context)
   at NUnit.Framework.Internal.Commands.TestMethodCommand.Execute(TestExecutionContext context)
   at NUnit.Framework.Internal.Execution.SimpleWorkItem.PerformWork()

  X RemoveOne [2ms]
  Error Message:
   Expected value to be 90, but found 100.
  Stack Trace:
     at FluentAssertions.Execution.LateBoundTestFramework.Throw(String message)
   at FluentAssertions.Execution.TestFrameworkProvider.Throw(String message)
   at FluentAssertions.Execution.DefaultAssertionStrategy.HandleFailure(String message)
   at FluentAssertions.Execution.AssertionScope.FailWith(Func`1 failReasonFunc)
   at FluentAssertions.Execution.AssertionScope.FailWith(Func`1 failReasonFunc)
   at FluentAssertions.Execution.AssertionScope.FailWith(String message, Object[] args)
   at FluentAssertions.Numeric.NumericAssertions`1.Be(T expected, String because, Object[] becauseArgs)
   at HelloClaptrap.Actors.Tests.Cart.Events.RemoveItemFromCartEventHandlerTest.RemoveOne() in D:\Repo\HelloClaptrap\HelloClaptrap\HelloClaptrap.Actors.Tests\Cart\Events\RemoveItemFromCartEventHandlerTest.cs:line 40
   at HelloClaptrap.Actors.Tests.Cart.Events.RemoveItemFromCartEventHandlerTest.RemoveOne() in D:\Repo\HelloClaptrap\HelloClaptrap\HelloClaptrap.Actors.Tests\Cart\Events\RemoveItemFromCartEventHandlerTest.cs:line 40
   at NUnit.Framework.Internal.TaskAwaitAdapter.GenericAdapter`1.GetResult()
   at NUnit.Framework.Internal.AsyncToSyncAdapter.Await(Func`1 invoke)
   at NUnit.Framework.Internal.Commands.TestMethodCommand.RunTestMethod(TestExecutionContext context)
   at NUnit.Framework.Internal.Commands.TestMethodCommand.Execute(TestExecutionContext context)
   at NUnit.Framework.Internal.Execution.SimpleWorkItem.PerformWork()


Test Run Failed.
Total tests: 7
     Passed: 5
     Failed: 2
Let's look at the code for one of the faulty unit tests.:
[Test]
public async Task AddFirstOne()
{
    using var mocker = AutoMock.GetStrict();

    await using var handler = mocker.Create<AddItemToCartEventHandler>();
    var state = new CartState();
    var evt = new AddItemToCartEvent
    {
        SkuId = "skuId1",
        Count = 10
    };
    await handler.HandleEvent(state, evt, default);

    state.Items.Count.Should().Be(1);
    var (key, value) = state.Items.Single();
    key.Should().Be(evt.SkuId);
    value.Should().Be(evt.Count);
}
AddItemToCartEventHandler.is the main test component of this test, and since both stateData and event are manually built, it is easy for developers to build scenarios that need to be tested as needed.There is no need to build anything special.
Now, as long as theAddItemToCart Event Handler restore the commented code and rerun the unit test.Unit tests pass.BUGS ARE ALSO NATURALLY FIXED.
Of course, there's another unit test of the deletion scenario above that fails.Developers can fix this problem by following the "breakpoint" and "unit test" ideas described above.
The data has been persisted.
You can try restarting Backend Server and the Web, and you'll find that the data you worked on before has been persisted.
We will cover it further in a later chapter.
Summary
Through this article, we have a preliminary understanding of how to create a basic project framework to implement a simple shopping cart scenario.
There's a lot of things we don't have to explain in detail.:Project structure, deployment, persistence, and more.You can read further to learn more.