A new version of Newbe.Claptrap has recently been developed, using Tye to aid the development of k8s applications.Let's take a brief look at how it's used in this series.
Install Tye
First, make sure that the netcore 2.1 or above version of the dotnet SDK is installed correctly.
Tye is currently in development, so only the preview version can be installed for use at this time.The link below allows you to search for the latest version and copy the CLI installation on the interface.
https://www.nuget.org/packages/Microsoft.Tye/
dotnet tool install --global Microsoft.Tye --version 0.6.0-alpha.21070.5
Once installed, run tye in the console and you can see the following results:
PS C:\tools\Cmder> tye
tye:
  Developer tools and publishing for microservices.

Usage:
  tye [options] [command]

Options:
  --no-default Disable default default options from environment variables
  -? -h, --help show help and use information
  --version show version information

Commands:
  init <path>        create a yaml manifest
  run <path>         run the application
  build <path>       build containers for the application
  push <path>        build and push applications contained to registry
  uploy <path>      upload the application
  unuploy <path>    delete employed application
Create and run a test project
Next we create a netcore app to test the deployment scenario.Choose a suitable location to run the following commands to create a test project:
dotnet new sln -n TyeTest
dotnet new webapi -n TyeTest
dotnet sln .\TyeTest.sln add .\TyeTest\TyeTest.csproj
That way, we get a test solution and a WebApi project.We can run the following command to start this service locally:
dotnet run --project .\TyeTest\TyeTest.csproj
After launch, you can open thehttps://localhost:5001/swagger/index.htmlbrowser to see the startup swagger interface.
Use tye to run the app locally
Next, let's close the previously running app and use tye instead to launch the test app locally.
In the solution directory, use the console to run the following commands:
tye run
After running, you may get the following results:
PS C:\Repos\TyeTest> tye run
Loading Application Details...
Launching Tye Host...

[12:11:30 INF] Executing application from C:\Repos\TyeTest\TyeTest.sln
[12:11:30 INF] Dashboard running on http://127.0.0.1:8000
[12:11:30 INF] Building projects
[12:11:32 INF] Launching service tyetest_9dd91ae4-f: C:\Repos\TyeTest\TyeTest\bin\Debug\net5.0\TyeTest.exe
[12:11:32 INF] tyetest_9dd91ae4-f running on process id 24552 bound to http://localhost:14099, https://localhost:14100
[12:11:32 INF] Replica tyetest_9dd91ae4-f is moving to a ready state
[ 12:11:32 INF] Selected process 24552.
[12:11:33 INF] Listening for event pipe events for tyetest_9dd91ae4-f on process id 24552
Follow the tips above to http://127.0.0.1:8000 the tye dashboard that started successfully on the computer.Open the dashboard using your browser to see a list of apps that have been deployed.As shown in the figure below:
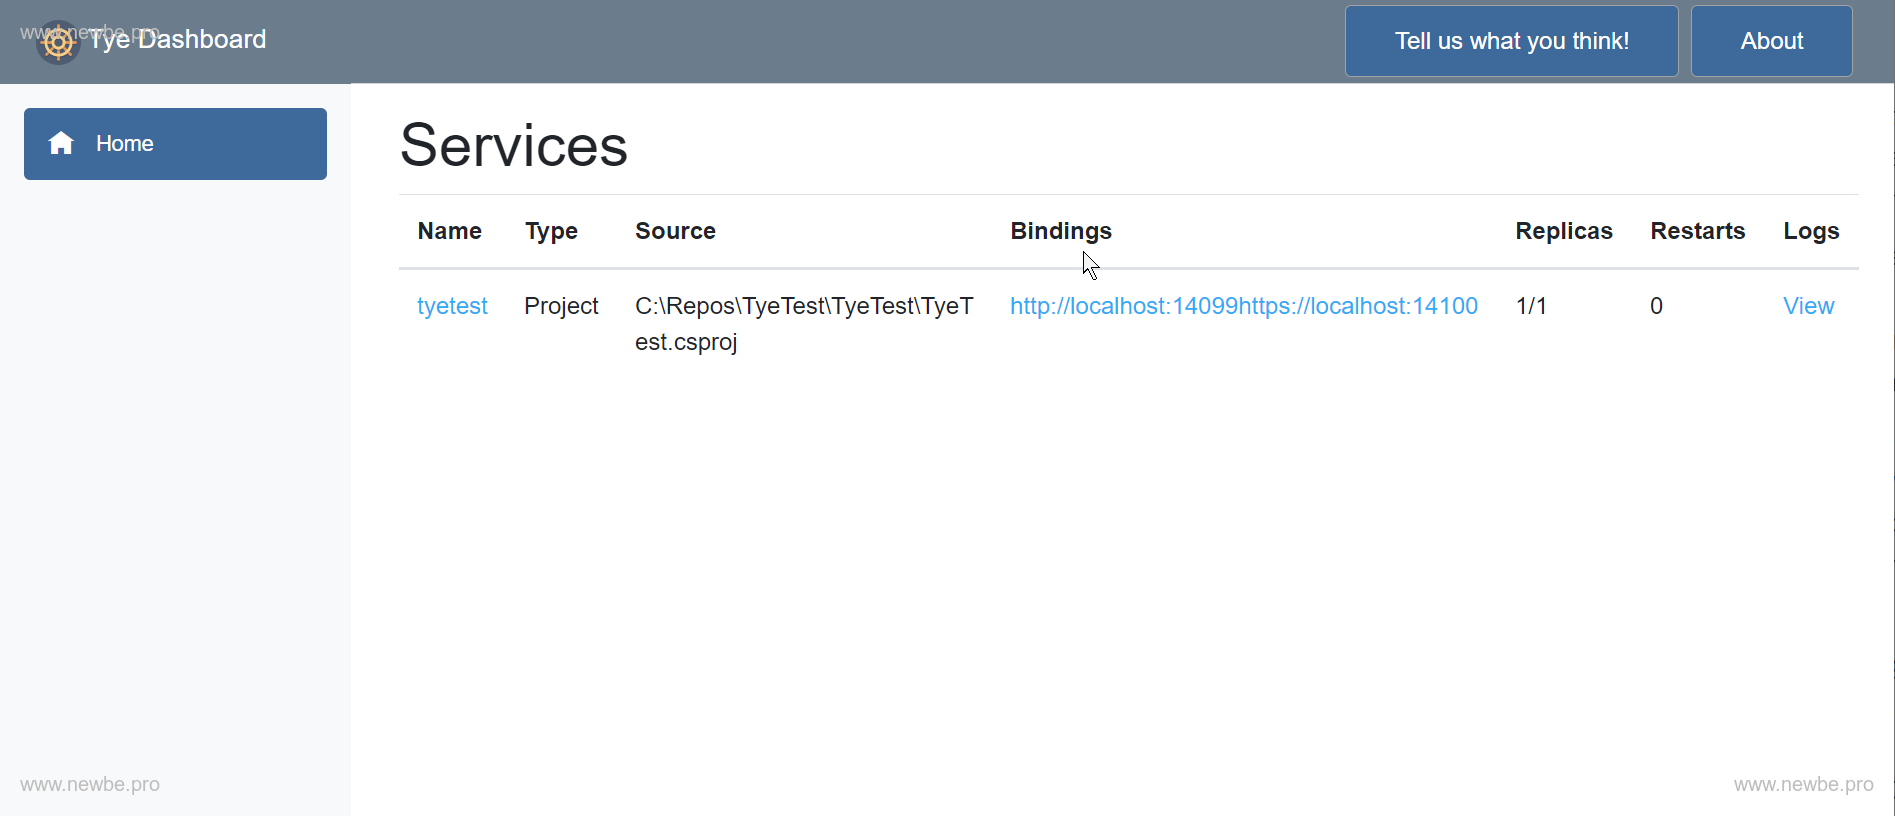
Dashboard shows that the tester has started and is bound to http://localhost:14099 and https://localhost:14100.In practice, in self-testing, the two ports are randomly selected, so there will be differences.
By opening swagger with the https bindings exposed above, we can see the same effect asdotnet runpreviously:https://localhost:14100/swagger
Deploy a k8s on-premises
Next, we'll use Tye to deploy the app to k8s.So in order to achieve this effect, you first need to prepare a k8s.
There are a variety of ways to deploy k8s on a development machine, and this experiment uses a Docker Desktop plus k8s scenario, either because of something else or because there are more or less problems with using other scenarios.Specific developers can choose.
The Docker Desktop s k8s scenario is well covered in the links below and is recommended for developers to refer to:
Docker Desktop Launches Kuberneteshttps://www.cnblogs.com/weschen/p/12658839.html
In addition to the k8s ontogene, this lab also requires the installation of nginx ingress and helm, which can also be installed with reference to the above article.
Deploy the app to k8s
But when k8s is configured, we can use tye to quickly publish the app to k8s for viewing.
Sign in to docker registry
First, you need to configure docker registry for the local docker.Because the docker image of the project is packaged and pushed to a docker registry during the process of publishing with tye.
Developers can choose from a variety of ways to get their own docker registry:
- Nexus OSS Repository
- Alibaba Cloud, Tencent Cloud, DaoCloud, and more all have free docker registry
- Docker hub, if the network is good
Usedocker loginto sign in to your docker registry.
tye init creates tye.yml
In the solution catalog, run the following command to create a tye.yml profile:
tye init
After running, the following files will be created in the solution:
name: tyetest
services:
  - name: tyetest
    project: TyeTest/TyeTest.csproj
This is the simplest tye.yml file.
Modify tye.yml
We add a line of configurations about docker registry in tye.yml to specify where the built-in image will be pushed:
name: tyetest
registry: registry.cn-hangzhou.aliyuncs.com/newbe36524
services:
  - name: tyetest
    project: TyeTest/TyeTest.csproj
For example, here the author is using the docker registry of the Hangzhou node of Alibaba Cloud, the namespace is newbe36524.So add a lineregistry: registry.cn-hangzhou.aliyuncs.com/newbe36524.
This is equivalent to, if built, a tag image ofregistry.cn-hangzhou.aliyuncs.com/newbe36524/tyetest:1.0.0and pushed into the Alibaba Cloud.
Download the netcore base image in advance
Because this time we're releasing a netcore program, they're going to be built with netcore images, so for a smoother build, it's recommended that you use the acceleration tool to download the underlying image locally in advance.
For example, the application of net5 TFM used by my person in this use of this time, requires a base image to be pulled locally as mcr.microsoft.com/dotnet/aspnet:5.0.
Since the source of the netcore underlying mirror has now been migrated from docker hub to mcr.microsoft.com.Therefore, it is recommended to use Newbe.McMirror to expedite downloads.
Detailed usage methods can be referred to:https://github.com/newbe36524/Newbe.McrMirror
If the developer doesn't know what the underlying image they currently need to pull is, they can also try the following step to publish directly, view the underlying image content used in the process, and then pull.
Use tye deploy
Now that everything is ready, you can publish by continuing to run the following commands in the solution catalog:
tye deploy
You may get the following results:
PS C:\Repos\TyeTest> tye deploy
Loading Application Details...
Verifying kubectl installation...
Verifying kubectl connection to cluster...
Processing Service 'tyetest'...
    Applying container defaults...
    Compiling Services...
    Publishing Project...
    Building Docker Image...
            #1 [internal] load build definition from Dockerfile
            #1 sha256:a3872c76e0ccfd4bade43ecac3349907e0d110092c3ca8c61f1d360689bad7e2
            #1 transferring dockerfile: 144B done
            #1 DONE 0.0s

            #2 [internal] load .dockerignore
            #2 sha256:9e3b70115b86134ab4be5a3ce629a55cd6060936130c89 b906677d1958215910
            #2 transferring context: 2B done
            #2 DONE 0.0s

            #3 [internal] load metadata for mcr.microsoft.com/dotnet/aspnet:5.0
            #3 sha256:3b35130338ebb888f84ec0aa58f64d182f10a676a625072200f5903996d93690
            #3 DONE 0.0s

            #7 [1/3] FROM mcr.microsoft.com/dotnet/aspnet:5.0
            #7 sha256:31acc33a1535ed7869167d21032ed94a0e9b41bbf02055dc5f04524507860176
            #7 DONE 0.0s

            #5 [internal] load build context
            #5 sha256:2a74f859befdf852c0e7cf66b6b7e71ec4ddeedd37d3bb6e4840dd441d712a20
            #5 transferring context: 3.87MB 0.0s done
            #5 DONE 0.1s

            #4 [2/3] WO RKDIR /app
            #4 sha256:56abde746b4f39a24525b2b730b2dfb6d9688bcf704d367c86a4753aefff33f6
            #4 CACHED

            #6 [3/3] COPY . /app
            #6 sha256:4a3b76a4eea70c858830bad519b2d8faf5b6969a820b7e38994c2116d3bacab2
            #6 DONE 0.0s

            #8 exporting to image
            #8 sha256:e8c613e07b0b7ff33893b694f7759a10d42e180f2b4dc349fb57dc6b71dcab00
            #8 exporting layers 0.0s done
            #8 writing image sha256:8867f4e2ed6ccddb509e9c39e86c736188a7 8f348d6487d6d2e7a1b5919c1fdb
            #8 writing image sha256:8867f4e2ed6ccddb509e9c39e86c736188a78f348d6487d6d2e7a1b5919c1fdb done
            #8 naming to registry.cn-hangzhou.aliyuncs.com/newbe36524/tyetest:1.0.0 done
            #8 DONE 0.1s
        Created Docker Image: 'registry.cn-hangzhou.aliyuncs.com/newbe36524/tyetest:1.0.0'
    Pushing Docker Image...
        Pushed docker image: 'registry.cn-hangzhou.aliyuncs.com/newbe36524/tyetest:1.0.0'

    Validating Secrets...
    Generating Manifests...
Deploying Application Manifests...
    Applying Kubernetes Manifests...
        Verifying kubectl installation...
        Verifying kubectl connection to cluster...
        Writing output to 'C:\Users\Administrator\AppData\Local\Temp\tmp2BC2.tmp'.
        Deployed application 'tyetest'.
Time Elapsed: 00:00:12:99
From the log of the output, we can see that the app has been published successfully.And with k8s dashboard or k9s, we can all see that the app has been successfully deployed and started.
tyetest-674865dcc4-mxkd5 ●● 1/1 Δ 0 Running Δ 10.1.0.73 docker-desktop 3m46s
It is worth noting that there are several prerequisites for ensuring that this step:
- You need to make sure that your local kubectl is configured correctly.In general, if you are using docker desktop, it is already configured
- You need to make sure that the docker login has succeeded.Developers can test whether the following images can be pushed manually before running the deployment
- If the download speed of the MCR image is not ideal, remember to speed it up with Newbe.McRMirror
Create and use ingress
By this point, we've finished publishing the app.However, because nginx ingress is not configured, the service can already run inside k8s, but is not accessed externally.That is, using a browser on your computer is still not open.So we also need to configure ingress for the service.Friends who haven't installed ingress for k8s, it's recommended to review the previous sections on installing k8s.
Here, we turn on tye.yml to add ingress-related configuration:
name: tyetest
registry: registry.cn-hangzhou.aliyuncs.com/newbe36524
services:
  - name: tyetest
    project: TyeTest/TyeTest.csproj
ingress:
  - name: tyetest-ingress
    bindings:
      - name: https
        protocol: https
    rules:
      - host: www.yueluo.pro
        service: tyetest
We've added an ingress configuration so that when traffic comes in from ingress and the domain name iswww.yueluo.pro, it's forwarded to the tyetest service.This enables external access to the k8s internal services.
First, usetye run command to see the effect locally.After you run the command, you may see the following in the dashboard:
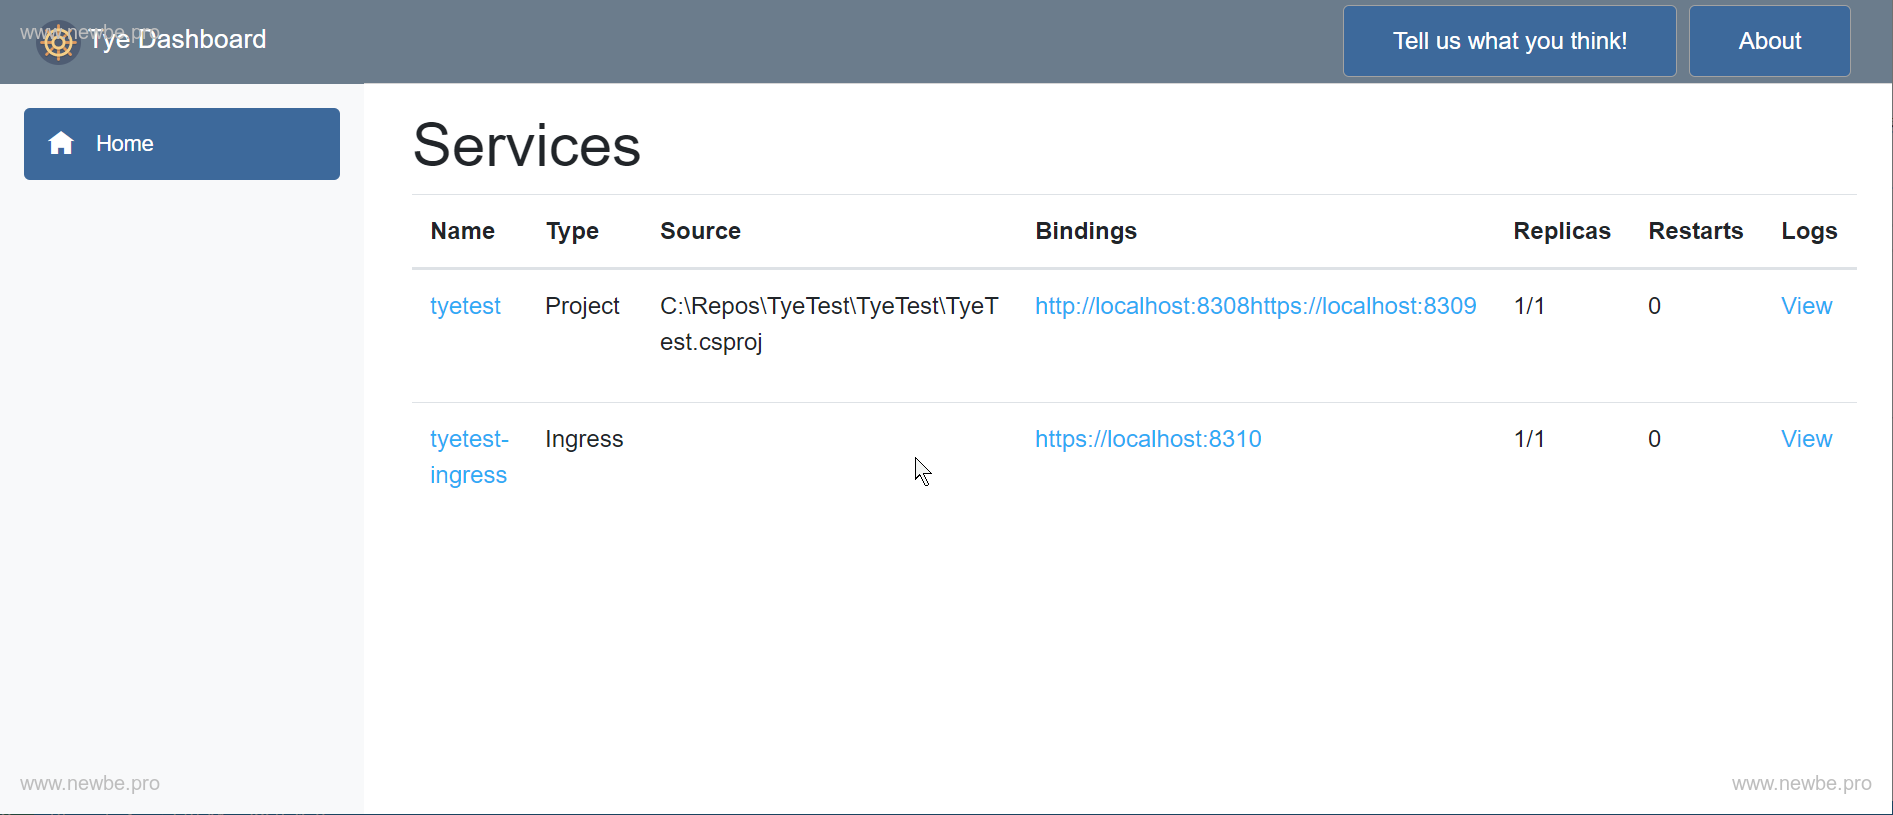
Where, https://localhost:8310 is the entry address of ingress.Because we're using domain name binding, there are two ways to access it to verify the:
- Add a mapping relationship www.yueluo.pro> 127.0.0.1 in hosts
- Use http to request direct access to the file.
Here we use the http request file to access the:
GET https://localhost:8310/WeatherForecast
Host: www.yueluo.pro
In this way, we successfully validate the results of the binding.
Note that the ports in it are not configured as fixed ports, so each time the developer should pay attention to the changes that occur.
Deploy ingress to k8s
Next, stoptye run, runtye deployand publish ingress and applications to k8s.
Note that the deployment of ingress can take tens of seconds, so you need to wait.
Once the deployment is complete, you can view the results of the deployment through k8s dashboards or k9s.
Also, you can use the following http request to verify the results of your deployment:
GET https://localhost/WeatherForecast
Host: www.yueluo.pro
The result is the same as it was before.
Uninstall the app from k8s
Uninstall the app,simple, tye undeploy.
PS C:\Repos\TyeTest> tye undeploy
Loading Application Details...
Found 3 resource(s).
Deleting 'Service' 'tyetest' ...
Deleting 'Deployment' 'tyetest' ...
Deleting 'Ingress' 'tyetest-ingress' ...
Time Elapsed: 00:00:02:87
Summary
In this article, we briefly described the simple steps of how to run or deploy an app using tye.There are many options that can be extended and customized in practice.Interested friends can https://github.com/dotnet/tye in the content.
Next, we'll deploy some slightly more complex multi-instance applications.